The Time Tracker app in Simply CRM allows you to quickly and easily track your time on any task that you’re handling in your Simply CRM instance. Its unique design provides you with the time tracking extension in almost every module – simply click on the clock in the top right corner of the module you’re using and you can start tracking time.
The Time Tracker app is currently compatible with the following modules: Organizations, Contacts, Leads, Deals, Tickets, Projects, Project Tasks and Project Milestones.
How to install the Time Tracker app
Important: If you’re an existing user, you may not have the Time Tracker app available in Simply CRM. If you cannot find the app by following the instructions listed below, please reach out to our support team. They will install the app for you, free of charge.
In order to install the Time Tracker app, open the Settings from the drop-down menu that appears when you press on your user icon in the top right corner.
Then, press App Management and select Apps.
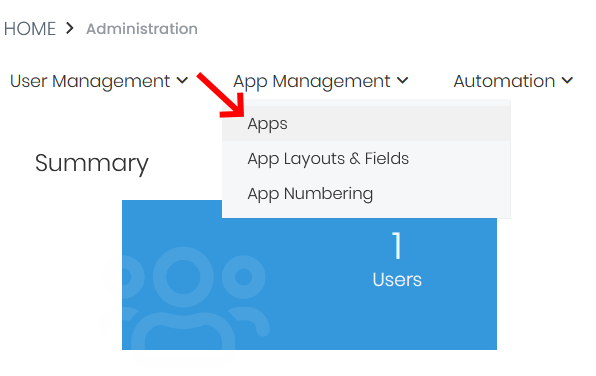
In the Simply App Store, find the Time Tracker card and press the Activate button. By clicking the button, you’ll make the time tracking extension available in your instance of Simply CRM.
How to configure the Time Tracker app
After you install the app, press Options on the left and select Settings on the Time Tracker card in the Simply App Store to set up your Time Tracker configuration.
When you press Settings, you’ll be led to the Time Tracker app page shown below. You can access this page by going through Settings > Other Settings > Time Tracker.
Here, you’ll see the following tabs: Module Settings, Event Settings, Time Tracking Settings, Comments, Invoice Settings, Sales Order Settings and Time Sheets. In the next sections, we’ll cover all the options that are available under these tabs.
Module Settings
Module Settings determines the modules (or apps) in which time tracking will be available. If you want to turn on or off time tracking in a specific module, simply check or uncheck the box next to the module name.
As mentioned earlier, time tracking is available in the modules: Organizations, Contacts, Leads, Deals, Tickets, Projects, Project Tasks and Project Milestones.
Event Settings
Event Settings lets you choose which fields will be available when you open the time tracking extension within a module, as well as their default values.
If you want to hide a field from the Time Tracker, uncheck its box in the Visible column. You can manually edit the default values for each using the Default column.
The table below describes each field that is available under Event Settings.
| Field | Description |
| Subject | Determines the title of the activity that will be shown in all overviews. |
| Status | Lets you specify whether the activity was Held, Not Held, Planned, Cancelled or Not Started. |
| Priority | Sets the priority of the activity: Low, Medium or High. |
| Activity Type | Allows you to choose the type of activity: Call, Meeting, Deadline, Email, Lunch, Time Logs, Task are the options available by default. |
| Visibility | Determines whether the activity will be public or private. |
| Description | Contains a brief description of the activity, as specified by the person who tracks the time. |
| Assigned To | Specifies which user will be assigned to the activity. You can choose between the logged in user and the user who owns the record. |
Time Tracking Settings
The Time Tracking Settings tab lets you specify whether the start and due time should be editable manually. If left unchecked, you won’t be able to manually overwrite the time recorded using the Time Tracker.
However, turning on manual edits may lead to abuses as it allows your team members to manually enter their time spent on a task.
Comments
Comments allow you to configure the comment-related settings in the Time Tracker. In particular, you can select whether your team members can leave comments on the time records and specify whether the comments should be auto-generated whenever someone tracks time on a task.
Invoice Settings
The Invoice Settings tab lets you select whether the time tracked can be billed to the client using invoices. Select Active to turn on the option to add time logs to invoices or Inactive to turn it off.
Sales Order Settings
The Sales Order Settings tab functions in the same way as Invoice Billing. By turning on sales orders, you allow users to add time logs to sales orders using the Time Tracker.
Time Sheets
Time Sheets allows you to choose whether the time recorded using Time Tracker will be shown in the company time sheets.
Important: Time Sheets is a secondary module that is currently not available in Simply CRM.
How to use the Time Tracker app
Once you activate the Time Tracker app and configure its settings, you can start using it in your Simply CRM instance. To start tracking time, simply navigate to one of the supported modules and open the detailed overview of a record.
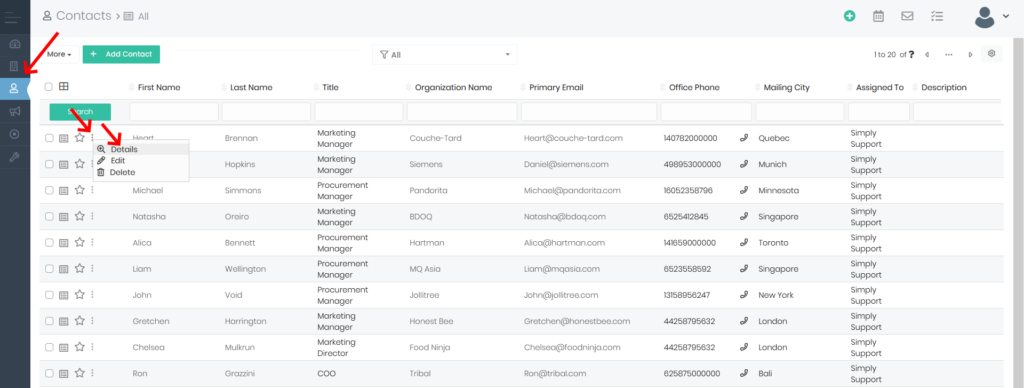
For example, you can open the Contacts module from the menu and then press the three dots icon on the left and choose Details on one of your contact records, as shown below.
On the detailed view of your record, you’ll see the time tracking extension in the top right corner. Click on the numbers in the top right corner to open the extension.
Important: It may take a few seconds for the extension to appear. If the extension does not appear, check your Time Tracker settings and make sure that the extension is active in the module you selected.
When you click on the extension, you’ll see the following pop-up in the bottom right corner:
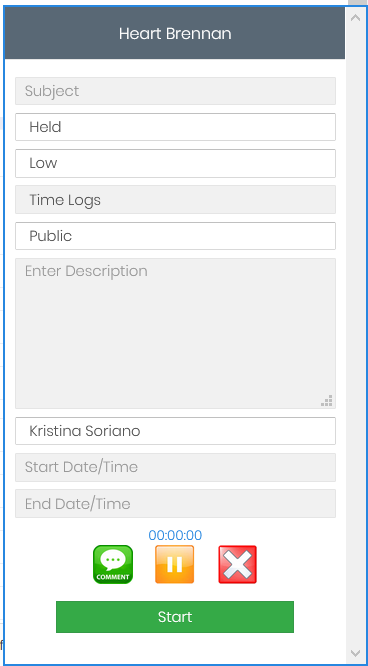
The pop-up window will contain the fields that you selected in the Event Settings. To hide the pop-up, simply click on the Time Tracker extension once more.
To start tracking time, press the Start button at the bottom.
When you start tracking time, you’ll be able to edit all the fields in the pop-up. Please keep in mind that you cannot edit the Subject, Description, Start Date/Time and Due Date/Time fields manually before starting the tracker.
Once the time tracking starts, you can use the orange button to pause the tracker or the red button to reset it. Pressing the Comment button will leave a comment for the time tracking session.
You can click the Complete button if you want to finish the time tracking session.
When you finish your time tracking session, you’ll be able to check it on the Activities tab of the selected record.
If you want to view all the activity details, click on the eye icon next to the Subject column. This will open the detailed view shown below:
Here, you’ll be able to edit all the activity details, including the Start Date/Time and Due Date/Time (if enabled in the Time Tracking Settings).
How to add time logs to invoices and sales orders
If you want to add the time you recorded with the Time Tracker to your invoices and sales orders, you’ll need to generate a time log, as described earlier.
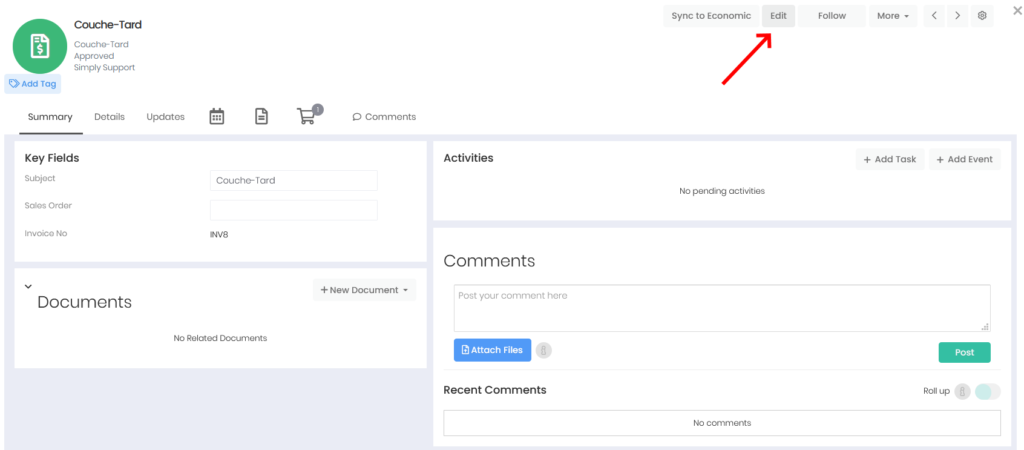
When you generate a time log, open the Invoices or the Sales Orders module. Open the detailed view of the desired invoice or sales order by pressing it on the list view and clicking the Edit button in the top right corner.
Alternatively, you can press the three dots icon next to the invoice name and select Edit.
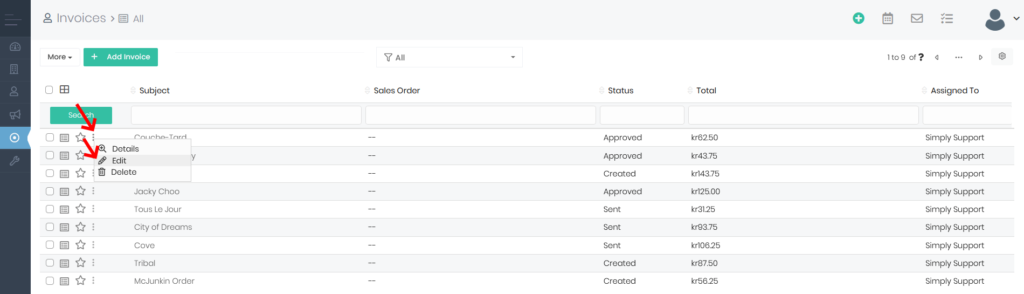
Scroll down to the Item Details section of the invoice.
If you activated the invoice billing settings, you’ll see the Review Time Logs button within the Item Name column.

Click on the button to open an overview of all time logs that are related to the contact or organization that you’re invoicing.

In the Review Time Logs pop-up window, you can search through the time logs and include or exclude related records. To add a time log to the invoice, simply check the box in the far left column and click the Add to Invoice button.
The selected time log will be added to the invoice, as shown below.
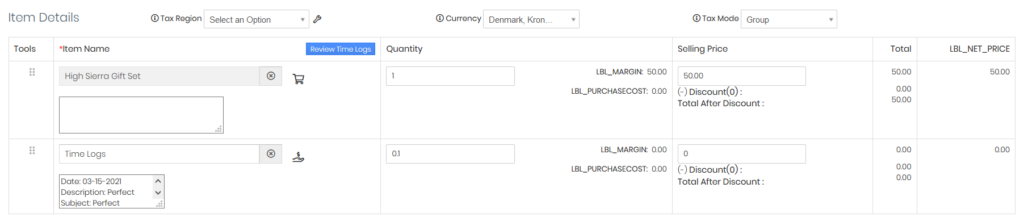
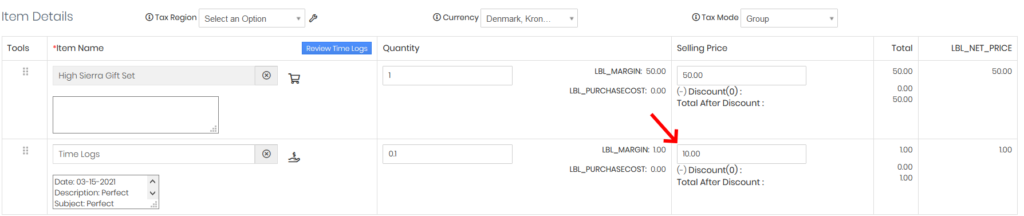
However, you’ll still need to set the price of the time log. To do that, simply edit the Selling Price column next to the Time Logs item.
If you need help editing invoice items, please check our in-depth guide on how to create invoices in Simply CRM.
In case you want to add a time log to a sales order, you can follow the same instructions. Just open the Sales Orders module and select a sales order record instead of an invoice. For a detailed guide on sales orders, please check our article on creating sales orders.
The Time Tracker extension works the same in all supported modules. If you need any help setting up time tracking in your instance of Simply CRM, feel free to reach out to us through LiveChat.


