Simply CRM allows you to create user accounts for all of your employees, which helps you track their tasks and monitor their information.
How to create and manage users
There are two types of users in Simply CRM: admin users and standard users. An admin can add others as standard users and access their information, check their tasks and overlook their progress.
Important: Only admin users can create and manage standard users.
To create a new user, follow the steps below:
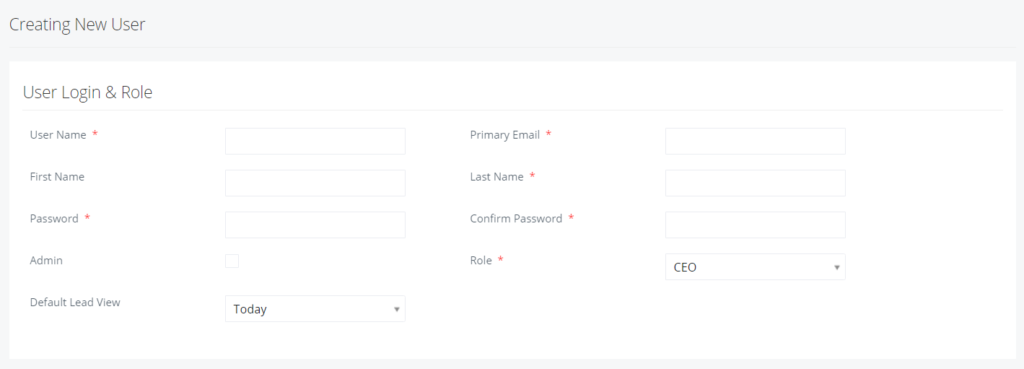
Under your Avatar select Manage Users option. In his window click on the green +Add User button at the top right corner of the screen.

In the User Name field, enter a unique user name. We suggest using the First name and Last name combination. Note, that you cannot use special characters, like a space.
In the Primary Email field, enter their email address.
When you create a user, Simply CRM will automatically create a new user record. However, keep the following rules in mind:
- If a record with the same Primary Email already exists, Simply CRM will only link to it.
- In case there are multiple records with the identical Primary Email, Simply CRM will link only the first one.
- In the event that there are no records with the same Primary Email, Simply CRM will create a new user record.
The First Name and Last Name fields are self-explanatory. Enter the user’s first and last name, respectively.
In the Password field, you will need to create a password for the new user. The password will be emailed to the user and they will be free to change it using the My Preferences page.
Re-enter the password in the Confirm Password field.
You can check or uncheck the Admin box, depending on whether you want the new user to have admin privileges.
The Role field allows you to set the current position of the new user.
After that, you can set the currency, number, address and additional information of the employee.

Press Save when you finish entering all the information.
Change user names
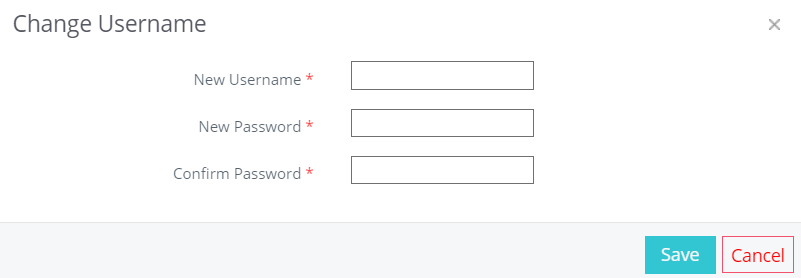
Administrators are the only users who have the privilege to change usernames. To change a username, go to the Users page and press on the Three-Dots icon on the left side of the user’s name and select Change Username option.
Enter the new username and password in the pop-up box that appears. Press Save to send the user an email with the new credentials.

Change email address
You can change the email address in the same way that you edit usernames. Go to Settings and select Users under User Management.
On the Users page, press on the Three-Dots icon on the left side of the user you want to update and choose the Edit option. Replace the information in the Primary Email field and press Save to confirm the changes.
Change names
Similar to the username, you can edit each user’s first and last name by updating the information in the relevant fields.
Select the user you want to edit by clicking on their record and, in the next window, click on the Edit button at the top right corner of your screen. Change the information in the First Name and Last Name fields. Press Save to rename the user and confirm the changes.
Transfer ownership
Account owners can transfer their ownership to an admin user.
To transfer ownership, open the page of the user you want to edit and press the User Settings button in the top right corner. From the drop-down menu, select the Change Owner option.
In the pop-up box that appears, simply select the user whom you wish to grant the ownership privilege and press Save.

In the event that an account owner moves and changes his unit, an admin user can transfer the ownership or mark the user as inactive.
Important: Keep in mind that the admin user who changes the ownership of the inactive account will become the new account owner.
Change ownership
Admin users can also change the ownership of an employee account. If you wish to change the ownership of an account, log into your admin account and open the Users page.
Press the only option on the left side of the user name and email and choose Delete.
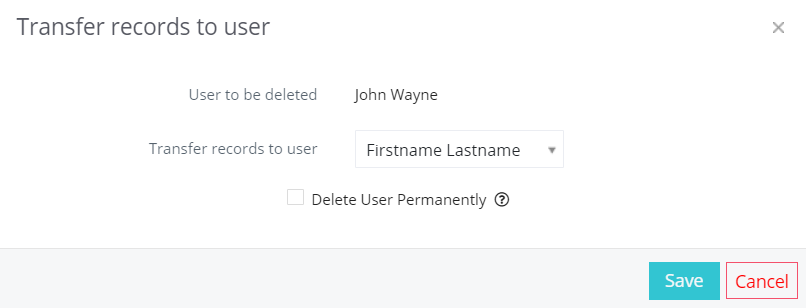
A pop-up box will appear and ask for confirmation. After that, you will be asked if you want to transfer the records to another user. Select the desired user and check the Delete User Permanently box.

Press Save.
Important: Once you delete a user, Simply CRM will permanently transfer all records to the new user.
Confirm email address
Email confirmation allows you to avoid spoofing and Simply emails being sent to the spam folder. All you have to do is verify each email in your CRM instance.
Keep in mind that each email needs to be verified only once.
Admins have the option to send confirmation emails to verify the user name and primary email address of each user in the CRM instance.
Important: You can always confirm your email under My Preferences. Unless you verify your email, you will not be able to save your email settings or send emails.
How to delete users
Admin users can delete users or make them inactive. To do this, open the Users page and press on the option on the left side of the user name and email.

Select the Delete option and leave the Delete Permanently box unchecked if you only want to make the user inactive. If you want to delete the user, check the Delete Permanently box.
In any case, you will be asked to transfer the records to another user. Select the desired user and press Save.
Important: Inactive users can be re-activated.
How to import and export users
Simply CRM allows you to quickly import and export all your users. To import users, select the Import option in the right corner and upload the .csv file with the user records.

Keep in mind that record importing can fail for various reasons, which will be listed in the import summary. This way, you can quickly fix the issue and re-upload the problematic records.
To export your records from Simply CRM, open the Settings in the top right corner and use the Export option.
Frequently asked questions
Can I change the user’s primary email?
Yes, you can change the primary email of each user in your CRM instance, if you have admin privileges. Open the Users page and press on the user whose email you want to change.
Simply CRM will load the user’s profile information. Press the Edit button and enter a new email address in the Primary Email field. Click Save to confirm the change.
How can I reactivate an inactive user?
Open the Users page and press on the Inactive Users button. Click on the only option on the left side of the user name and email and select the Restore option. The inactive user will automatically be moved to the Active Users list.
Why can’t I change the user name, first name, last name or email address?
If you follow all the instructions given here, but still can’t edit the necessary information, please check if you have admin privileges and/or contact your administrator for help.


