Simply CRM allows you to configure Price Books to help you better manage your products and services. Price Books act as catalogues and they help you create more flexible pricing options and customize your offers for individual customers.
For example, Price Books allow you to configure wholesale and retail prices, and offer seasonal promos or discounts, without editing the product itself.
In fact, you can vary the prices of your products whenever and however you want. This lets you reward your best customers or leads with personalized discounts and special offers.
How to install Price Books in Simply CRM
Before you start creating Price Books for your products/services, you will first need to activate the Price Books module in Simply CRM.
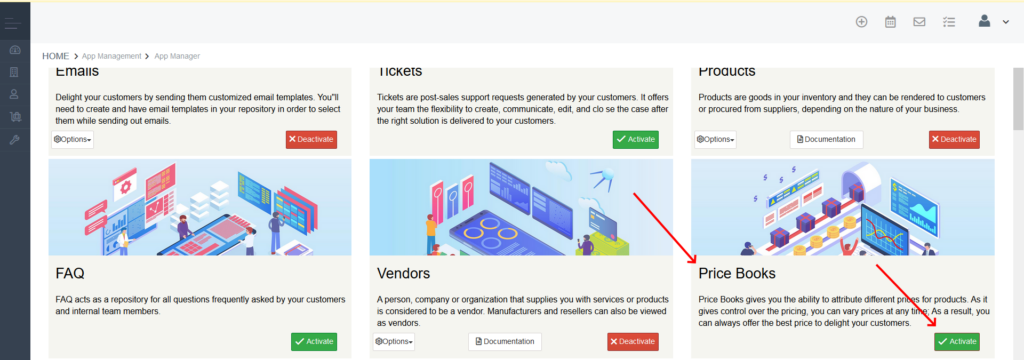
To achieve that, visit your Settings page and select Apps from the App management option in the main menu.

Browse through the new window to find the Price Books app. Then press the Activate button in the bottom right corner.

When you activate Price Books, you’ll get access to configure the module’s settings directly from the Apps list. The Options button on the left allows you to quickly configure the Price Book module layout, workflows, picklist values and numbering settings.

For more details on how to edit module settings, please visit our guide on adding and editing module fields.
Once you activate Price Books, you can access the app by opening the Inventory tab on the left menu and choosing Price Books.
Important: After you activate Price Books, you’ll need to refresh your page to see it in the menu.
On the module page, press the Add Price Book button in the top left corner.

In the new window, you’ll be able to configure the Price Book name, currency and status. If you wish to create an inactive Price Book, simply uncheck the Active box.
Optionally, you can also add a brief description of the Price Book.

When you finish configuring the Price Book settings, press Save.
Your new price book will be listed on the Price Books module page, as shown below.

Select the Price Book from the list to open its detailed view. Then, click on the Products tab.

To set up special pricing for your products, click the Select Product button.

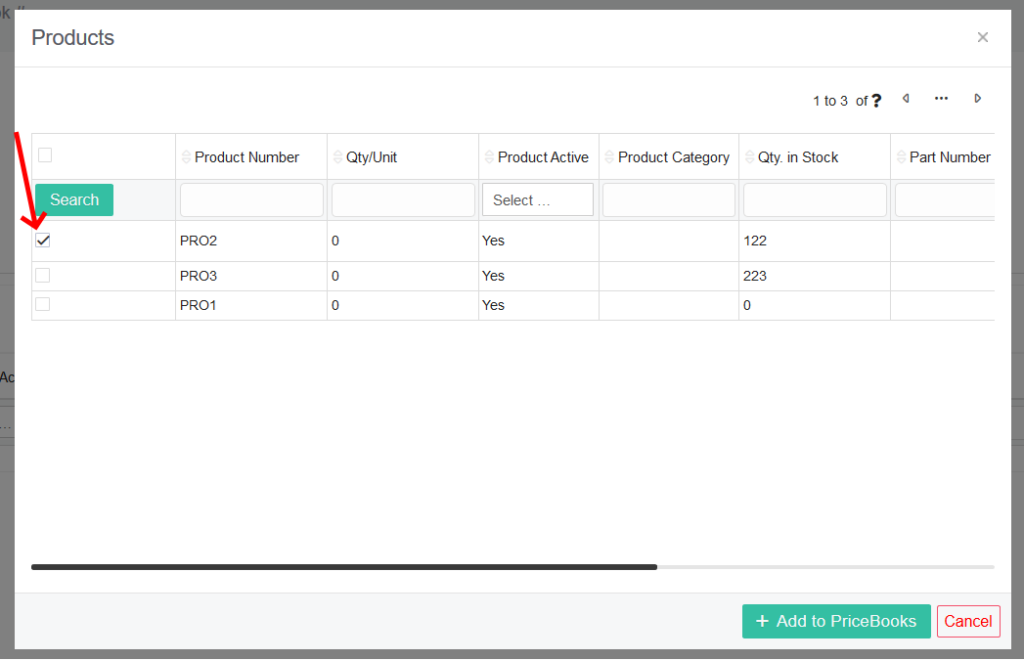
In the resulting pop-up window, you’ll be able to select the products that you want to add to your Price Book as well as configure their selling price. Simply press on the check mark box on the left side next to the Product Number column to add it to the Price Book.
Once you finish selecting the products and setting their prices, press the Add to PriceBooks button.

Important: The selling price you choose here will only be applied to products within the Price Book. Outside of the Price Book, the product will retain its original price.
The products you add to the Price Book will now appear in the Products tab in the detailed view of your Price Book, as shown below.

In case you want to add services to your Price Book, follow the same steps described above. Just select the Services tab at the start.

You can also add products and services to Price Books from the detailed view of individual product/service records. Locate the desired record in its module, click on it to open the detailed view and then select the Price Books tab.

In the Price Books tab, you’ll be able to create a new Price Book by clicking on the Add Price Book button as well as add the product to an existing Price Book by using the Select Price Book button.

How to use Price Books
As mentioned earlier, Price Books allow you to offer unique pricing models for your products and services. Using Price Books, you can reward long-time customers or encourage new clients to purchase your services/products by offering them special deals.
You can achieve this by applying Price Books when creating invoices, quotes and sales orders.
First, navigate to the desired module, for example, Invoices. Then, click on the Add Invoice button in the top left corner.

Fill out the invoice details according to your needs. If you’re unsure how to fill out an invoice, please check our in-depth guide on creating invoices in Simply CRM.
When you scroll down to the Item Details block, select the product or service that you want to add to your invoice. Then, you’ll see the Price Book icon in the Selling Price column.

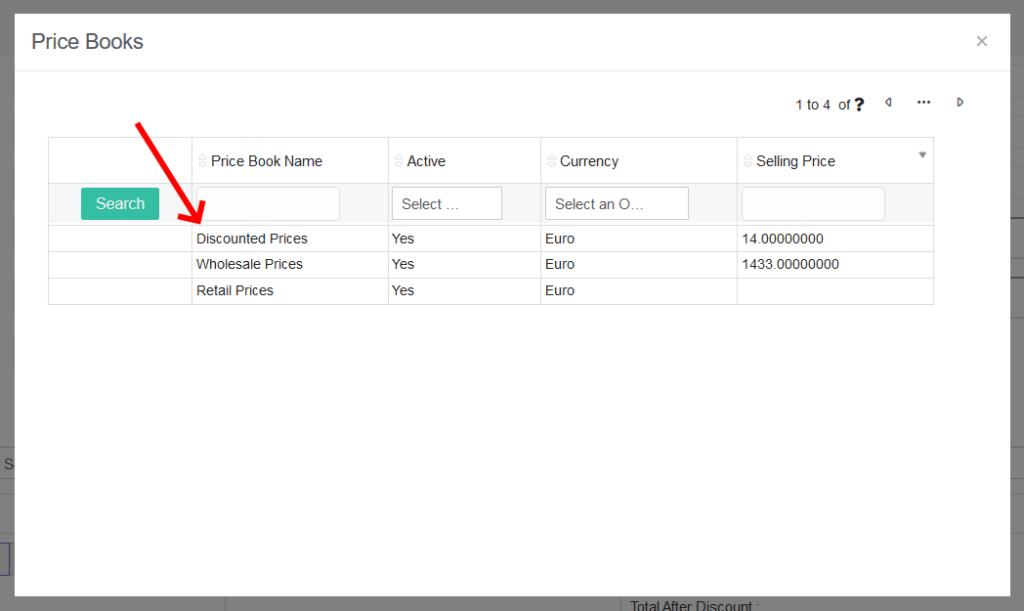
When you press the icon, you will get a pop-up window in which you’ll be able to select what Price Book you want to apply to the invoice. Simply click on the Price Book name to apply its selling price.

Once you select the Price Book, the Selling Price column in the invoice will be automatically updated to reflect the new price imported from the Price Book you selected.

Important: The pop-up window will only show you the Price Books that contain the item that you added to your invoice.
When you finish creating the invoice, press the Save button at the bottom of the page.
If you want to apply Price Books to sales orders or quotes, follow the same procedure in the appropriate module.


