Xero is a powerful online accounting software that helps small businesses better manage their incomes, expenses, inventory and invoices. Since its launch in 2010, Xero has positioned itself as the industry leader for bookkeepers and accountants from all over the world.
Today, Simply CRM is happy to announce that our system fully integrates with Xero to provide a centralized overview of all your financial data. If you’re ready to integrate Xero with Simply CRM, contact our support and we’ll install the integration module for you, free of any charge.
If you already have Xero installed on your instance, continue reading to find out how you can sync your Xero data with Simply CRM.
Important: Simply CRM uses the latest module version – XTiger 0.0006 for Xero.
How to generate a Xero API key
Before you start using your Xero records in Simply CRM, you’ll first need to generate a Xero API key, which will allow us to sync the data between the systems.
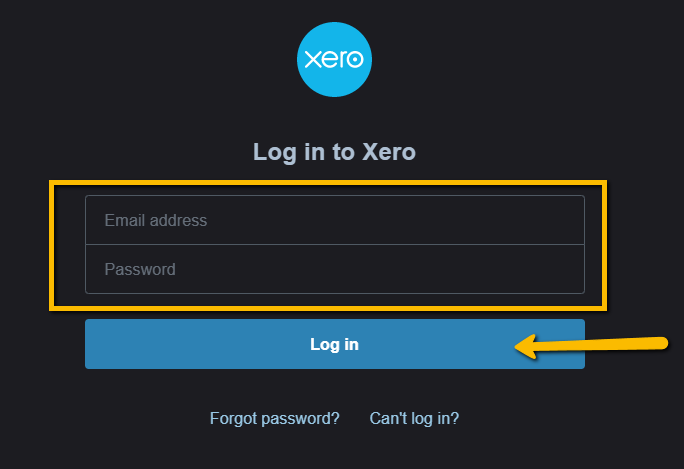
To get your Xero API key, visit the Xero website and log into your account.
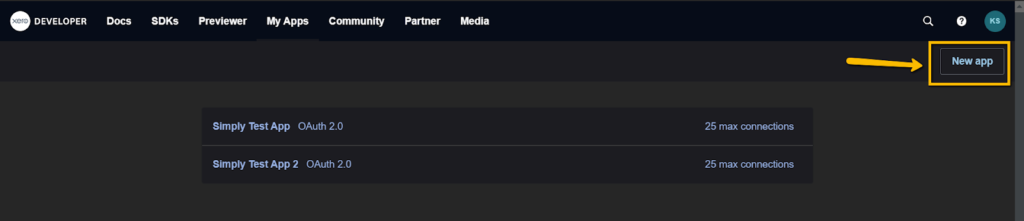
Once you log in, open the My Apps page. Then, press the New App button in the top right corner.
In the resulting window, you’ll need to enter the following information:
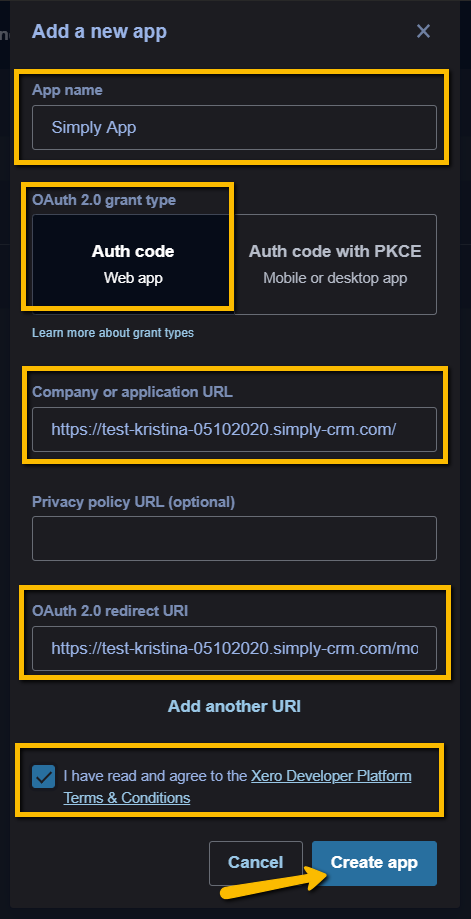
| Field | Information |
| App Name | Enter your preferred app name here. For example, Simply App. |
| OAuth 2.0 grant type | Select Auth Code Web App to ensure a smooth experience. |
| Company or application URL | Enter the URL of your Simply CRM instance here. |
| Privacy Policy URL | You can leave this field blank or enter the URL to your privacy policy page. |
| OAuth 2.0 redirect URI | Here, you’ll need to enter the following URL: https://instanceURL/modules/XTiger/callback.php. Replace instanceURL with the URL of your Simply CRM instance. For example, https://simplytest.simply-crm.com/modules/XTiger/callback.php. |
Once you enter the necessary information, click on the checkbox to agree to the Xero Terms and Conditions. Then, press the Create app button at the bottom of the page.
After you create the app, you’ll be led to the page with the app details, as shown below.
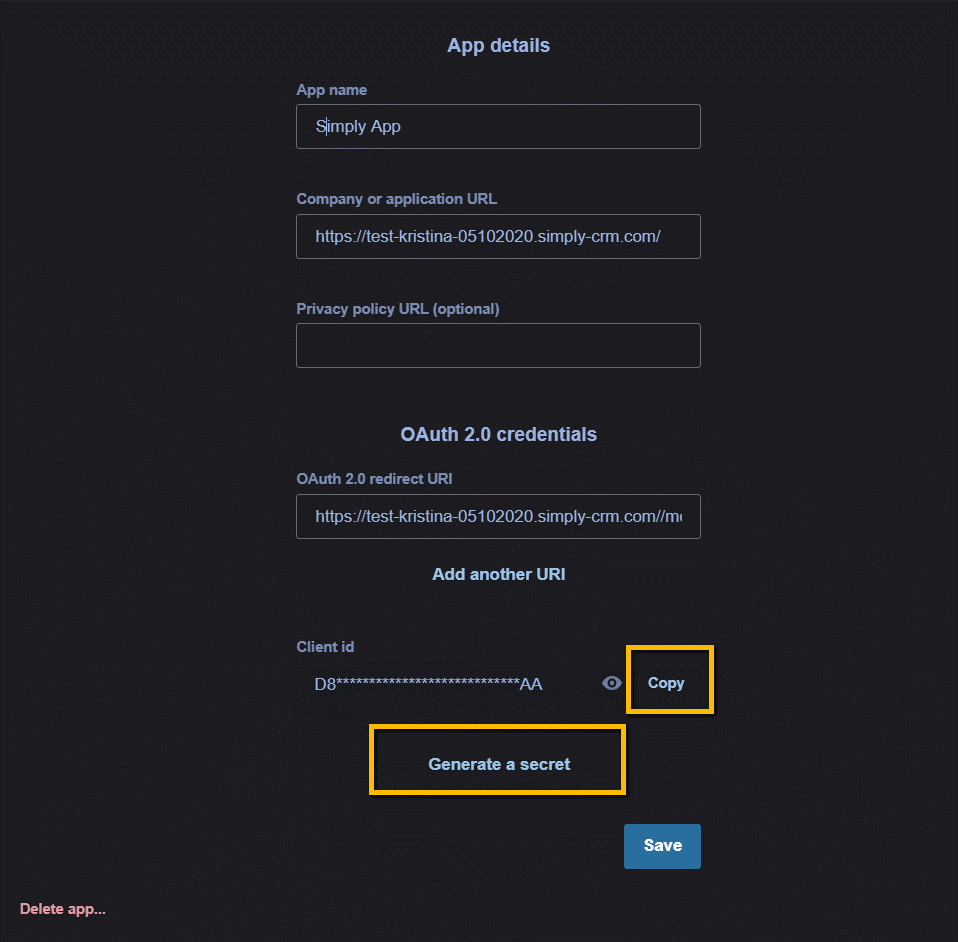
Here, you’ll need to copy your client ID, generate the secret key and the referral ID (XTID).
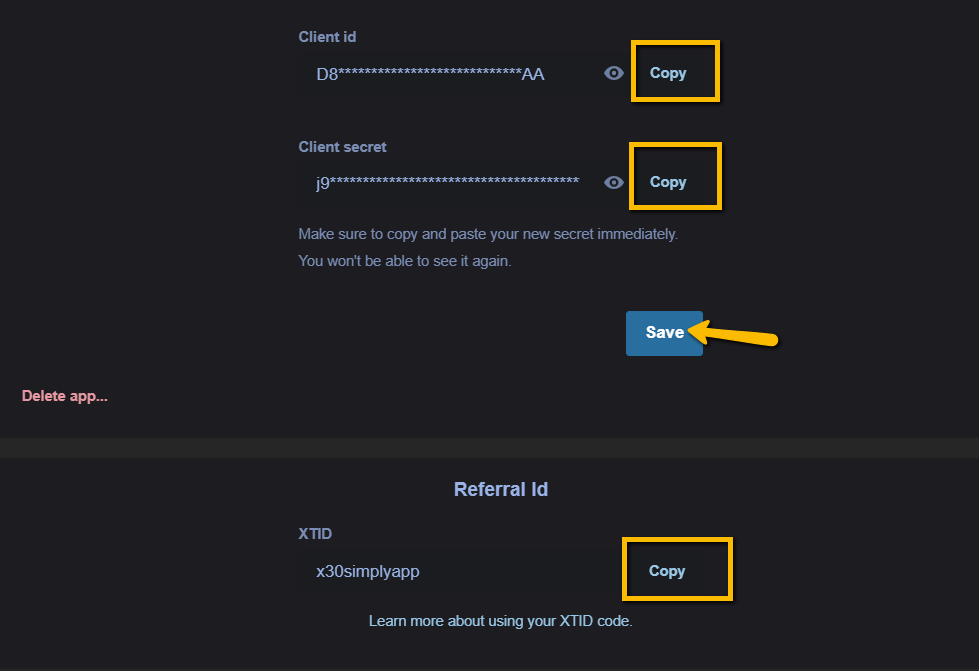
Create a copy of all three data points in a local file immediately. You’ll later need these credentials to establish a connection between Xero and Simply.
How to install and configure the Xero app
As we mentioned earlier, our support team will be more than happy to install the Xero app on your instance of Simply. Just drop us a quick message through live chat or our contact page.
Important: After you approach us with an installation request, please allow some time for our support team to install the app on your instance. We will typically set up the Xero app within 24 hours.
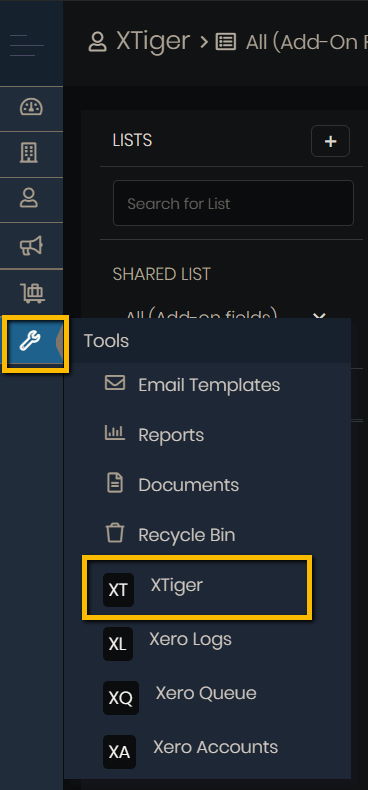
Once the Xero app is installed on your instance, you’ll need to configure it. In this step, you’ll need to open the Tools menu on the left and select Xtiger.
Click the Install button to start the installation process.
Open a new window then copy and paste the URL https://instancename/index.php?module=XTiger&view=List&service_set=API#. Replace the ‘instancename’ with the name of your instance. For example, https://nwl.simply-crm.com/index.php?module=XTiger&view=List&service_set=API#.

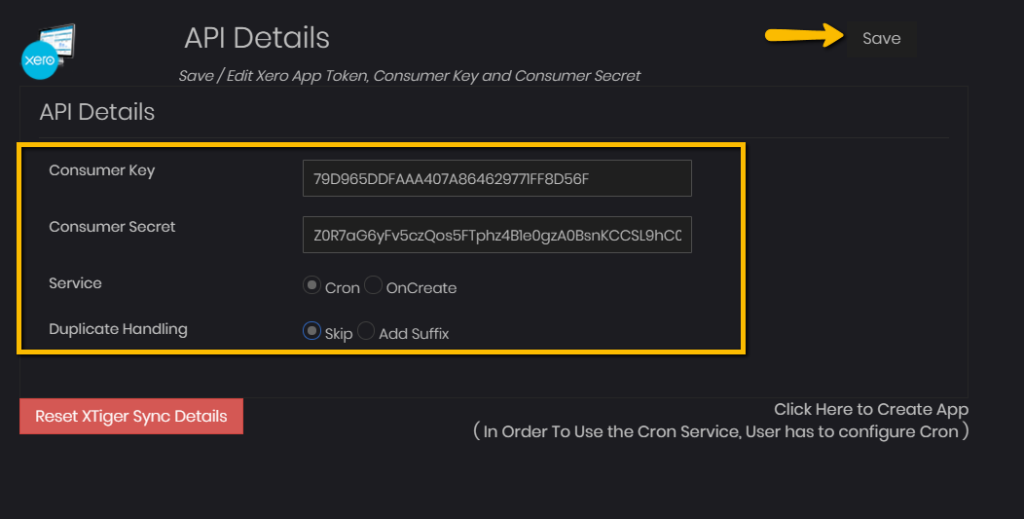
Then, click the Edit button in the top right corner.

You’ll need to enter the following information here:
| Field | Information |
| Consumer Key | Enter the Xero Client ID here. |
| Consumer Secret | Paste the Client Secret key in this field. |
| Service | Select Cron here. |
| Duplicate Handling | Select Skip. If you choose Add Suffix, the system will add a unique contact or organization ID during the sync. |
Once you enter all the necessary data, press the Save button in the top right corner.
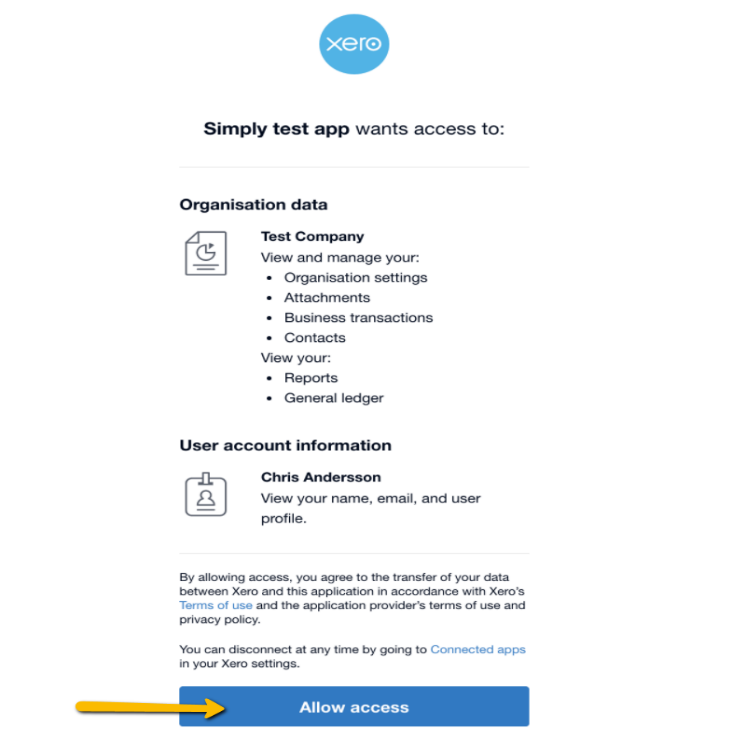
If you’re saving the credentials for the first time, you’ll be led to a new screen where you’ll have to allow access to your Xero account. Press the Allow access button at the bottom of the page to proceed with the integration.
How to use Xero with Simply CRM
When you finish configuring Xero in the XTiger app, you’ll be able to freely sync your data between the two systems. If you’re unsure how to perform the synchronization, follow our quick guide below.
However, before you start synchronizing any data, it’s important to keep the following notes in mind.
If you do not enter any data in the mandatory fields for the Organization, Products and Invoice modules, the records with the missing data will not be synced. Instead, they will return a failed notice. Make sure all mandatory fields are filled in before you start a sync.
Similarly, please ensure that Xero and Simply CRM use the same base currency before initiating any syncs.
You can perform a sync manually by opening the Xtiger app through the Tools menu. Simply select the module you wish to sync and press the Sync button. The Sync Results field on the right will inform you about the sync status, as shown below.
How to sync Xero records with Simply CRM
If you wish to sync your Xero records with Simply CRM, use the options highlighted below. By using these options, you’ll update your Simply CRM data with Xero records.
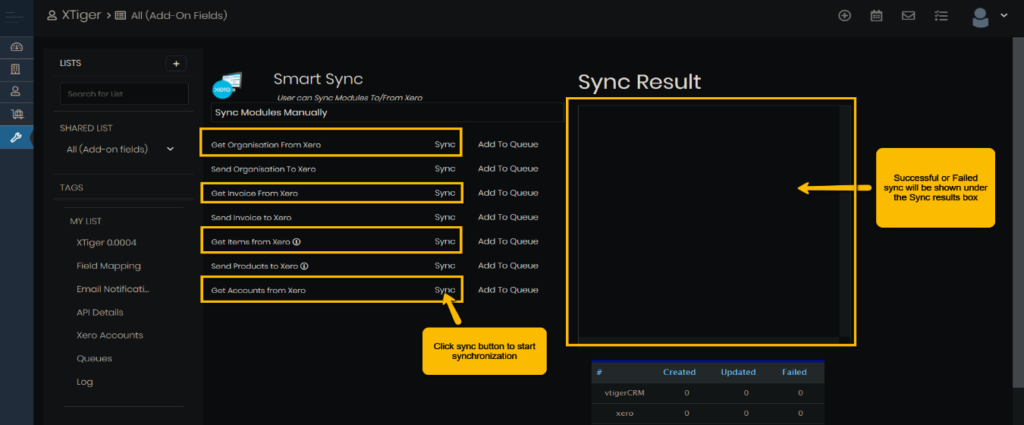
The following table describes how each sync option works in Simply CRM.
| Option | Result |
| Get Organisation from Xero | Syncs Xero data with contacts/organizations in Simply CRM. |
| Get Invoice from Xero | Syncs invoices from Xero to Simply CRM. For more information, check the Xero documentation. |
| Get Items from Xero | Syncs items from Xero with Simply CRM products. |
| Get Accounts from Xero | Syncs accounts from Xero with Simply CRM. |
How to sync Simply CRM records with Xero
Simply CRM supports bidirectional synchronization, which means you can update your Xero data with the Simply CRM records.
If you want to sync your Simply CRM data with Xero, you can use the following options. By using either of the options highlighted below, you’ll update your Xero data with Simply CRM records.
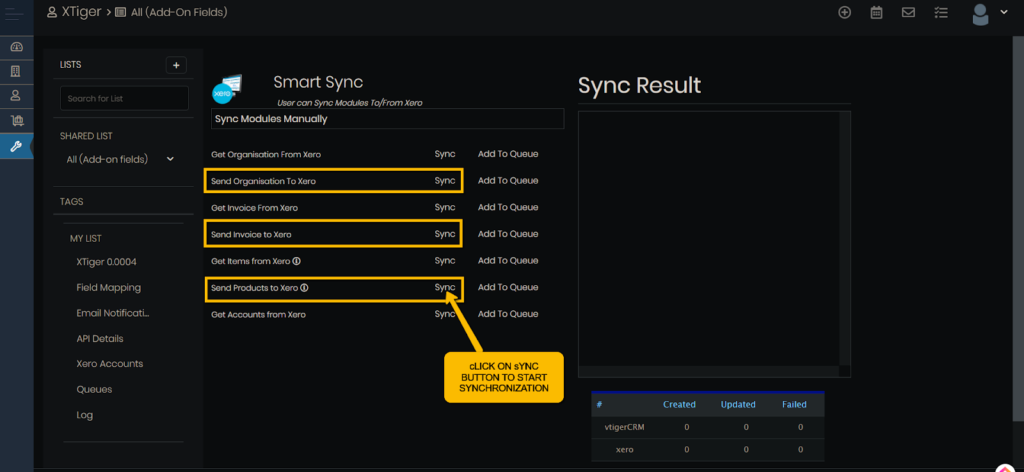
The next table will describe how each of the options works:
| Option | Result |
| Send Organisation to Xero | Syncs Organizations/Contacts from Simply to Xero. |
| Send Invoice to Xero | Syncs Simply CRM invoices to Xero. |
| Send Products to Xero | Syncs Simply CRM products to Xero. |
Before you initiate a sync from Simply CRM to Xero, please consider the following guidelines and restrictions.
You’ll need to make sure that the Xero Status field under Xero Information always has a value before syncing invoices. Otherwise, the sync may fail.
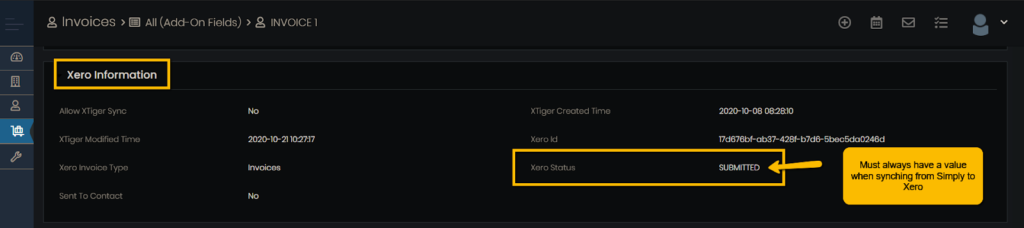
It is currently impossible to update or change the Xero Status field to Paid or Voided through Simply CRM. This change needs to be done manually in Xero and synced back to Simply. Please note that this is a system limitation.
Before syncing from Simply CRM, you should make sure that each product has an associated Xero account. You can associate a Xero account with a product by opening the product page and pressing the Xero Accounts button.

Then, click on the Select XeroAccounts button to choose from the available Xero accounts. Before you press this button, you should first perform a Get Accounts from Xero sync to make your Xero Accounts available in Simply.
Once you select a Xero account, its name will be displayed on the product page. You can then view, edit or unlink the account as necessary.
Additional features available in Simply CRM
Aside from Xtiger, which you can use to sync your data between Simply CRM and Xero, our system provides you with three more useful features to help you make the most of your Xero integration.
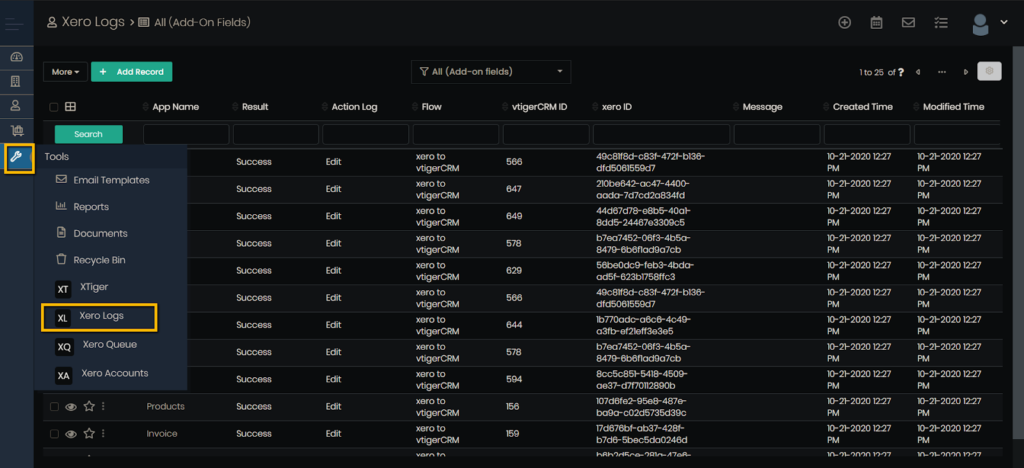
With Xtiger, you get Xero Logs, Xero Accounts and Xero Queue.
Xero Logs provides you with a list view of the sync result details, which includes the App Name, Success/Failed Result, Action Log, Flow, CRM ID, Xero ID, Error Message, Created Time, and Modified Time. You can use these logs to find out why any specific synchronization attempt failed.
You’ll find Xero Logs by opening the menu on the left side and selecting Xero Logs under Tools.
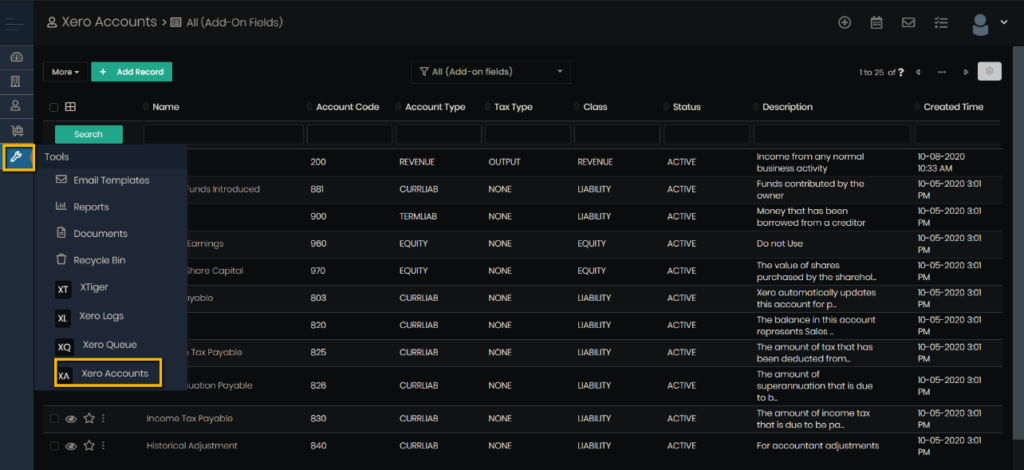
Xero Accounts displays a list view of the Xero Account details that have been synced from Xero. These details include Name, Account Code, Account Type, Tax Type, Class, Status, Description, Created Time, and Modified Time. Similar to Xero Logs, you can access Xero accounts by choosing Tools from the main menu on the left side.
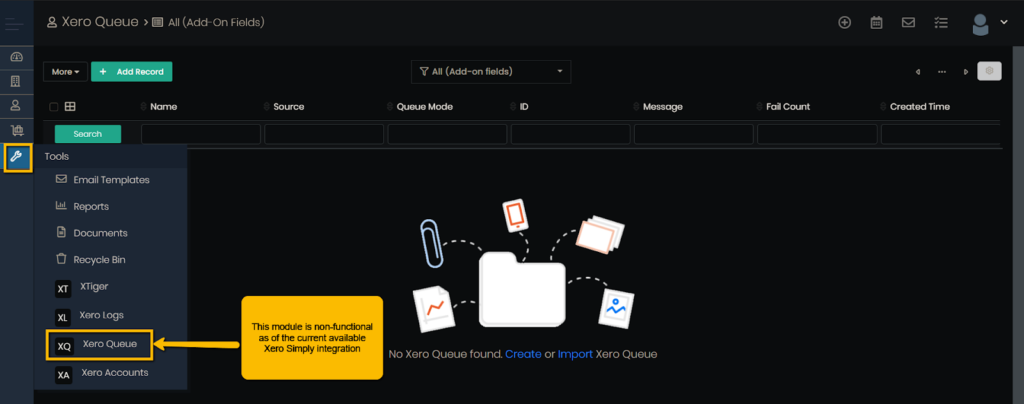
Xero Queue displays a list view of all records that are scheduled for a sync using the Add to Queue in the XTiger module.
Important: Xero Queue is temporarily unavailable. We will update the article as soon as Xero Queue becomes functional.
Xero FAQs
How can I deactivate my Xero account in Simply CRM?
If you wish to remove the Xero app from Simply CRM, visit the Simply App Store. You can access the App Store by selecting Settings > App Management > Apps. Find the Xero app in the store and press the Deactivate button.
What will happen to my records if I uninstall Xero from Simply CRM?
Your records won’t change when you uninstall Xero, but you will no longer be able to sync your records with Xero.
I keep receiving an error message saying: token_rejected. What should I do?
If you are receiving the token_rejected error or a warning message saying or Check whether the provided tokens are correct or not, please try removing and re-authenticating your Xero account in Simply CRM. If the issue persists, you can contact our support through live chat.


